MY PROJECTS

DIY BACK TO SCHOOL PENCIL POUCH
Getting my daughter ready to go back into school and I want to make sure all her stuff is super cute (but also unique so no one takes her stuff). This sturdy pouch comes from Amazon (link in my bio) and holds a lot of things. I added the message "Be Kind" to remind her and everyone around her that everyone needs to have a good time at school and everyone needs a friend. 🌈
Poli-Tape's Poli Flex Turbo HTV is really thin which means you can can layer many layers on top of each other. Remember to use a Teflon sheet when pressing each layer to protect the first layers. The words "Be Kind" are in Star Flex "rainbow".
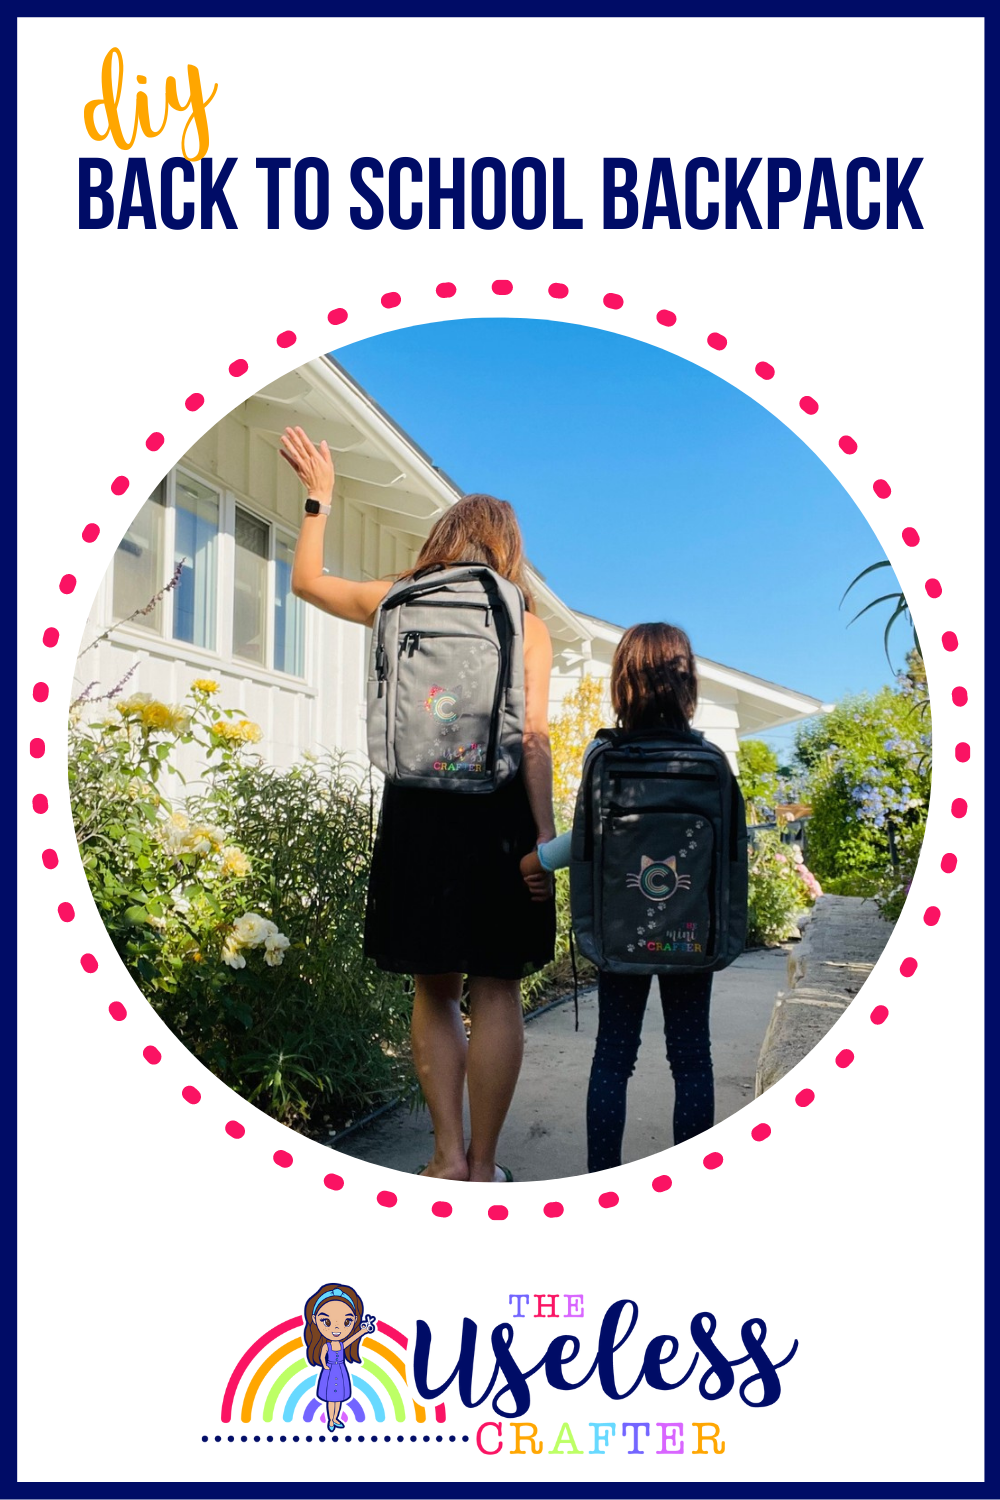
DIY BACK TO SCHOOL BACKPACK
Reflective HTV from Poli-Tape on a backpack! The paw prints… just in love … look at how it glows when light hits it at night. Not that my daughter is allowed anywhere at night lol … but you’re going to see us if we are walking on the street. 😁😁😁.Then after I went back and added so much more HTV. It’s crazy to think how much heat this backpack got. But it’s the htv from Poli-tape that allows for low heat and low press times

DIY BACK TO SCHOOL THERMOS
A perfectly layered thermos lol. You have to celebrate these wins!!!
I am really a big fan of using the registration marks in addition with covering up the majority of the design when you’re putting it down. It really makes it so much easier when you have a small exposed sticky section to maneuver around to line up. I promise it’s worth the extra steps!!!
AND let it cure!!!! This applies to both HTV and adhesive vinyl projects. Let it sit for a day or two before you wash. Personally my thermos projects for my 6 yr old sits for a week. We need all the help we can get. Lol. And they do last 🙌🏻🙌🏻🙌🏻.

BRIDAL SHOWER LABELS
Bridal Shower Party Favors - so easy to execute!!!!
My favorites are all in play: Canva, Creative Fabrica & Neato Labels
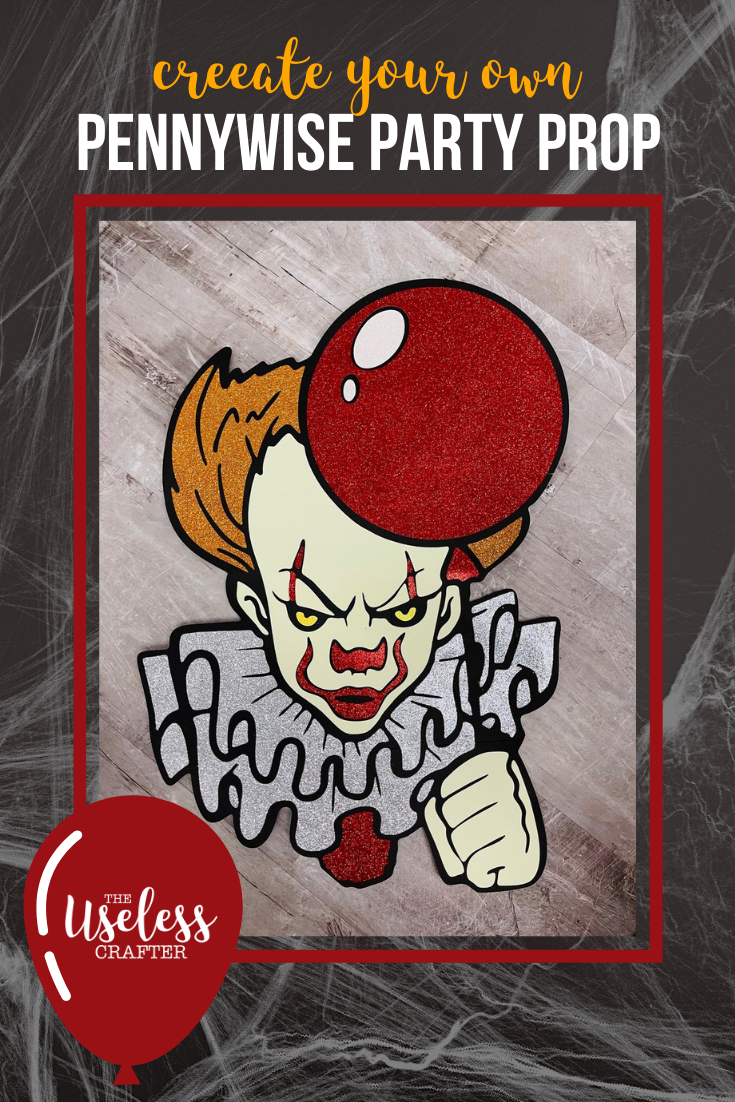
OFF THE MAT: PENNYWISE - IT
Love love love how this turned out!!! Mixing a little luminous htv with my usual glitter cardstock for this craziness 🤡🤡😱just perfection 💛💛💛
26 inches and he glows in the dark! I used the luminous htv (heat transfer vinyl from Poli-Tape) on cardstock to get a super scary effect. In love!!
Tips:
1. I like to weld pieces together to make it easier to piece together and have fewer pieces to keep track of. For example check out the collar. I added little circles to connect pieces.
2. I struggled with the htv a bit because I didn’t apply enough pressure and heat. Next time it’ll be better. But I absolutely loved the results.

CARDSTOCK 3D GLOBE MANDALA
Just my favorite mandala project - 16 layers including one of htv (cause you know I had to). Separated with foam tape when there was room, and when the layers were too thin and delicate, Bearly Art Glue glue for the win. The cardstock is just to die for from 12x12 Cardstock. So many shades of blue and green 💙💚💙💚💙💚💙.

DIY ACRYLIC WEDDING SIGN
Acrylic signs. It’s been one of my favorite projects because it’s so easy to do it flawlessly.Make sure the design is cut with adhesive vinyl or HTV/iron-on vinyl AND draw your design. The drawing will go underneath the acrylic sign and will be your guide ensuring a perfectly straight sign. When you’re not worrying about where to place the vinyl, you can concentrate on keeping the vinyl taut ... ensuring there are no bubbles. This works for big signs and small signs!!

OFF THE MAT: FRIDA
So March is Women's History Month and so I love how I stumbled upon Frida through a request from one of my followers. I have to admit that I knew very little about Frida prior to this - her unibrow, she's an artist and from Mexico. She's known for her self portraits, her love of Mexican and indigenous culture, and is a feminist icon... and I picked up a little fact that she loved her jewelry.

OFF THE MAT: SELENA
The video tutorials were different this time because each process took many hours. So for the design space tutorial, it was more of a ‘tour’ of what was on my canvas, why I did certain things, and how to work this file. Would love to get your thoughts on this!!!! And the assembly video did not go through the entire process. But trust me when I tell you it took many many hours 🤣😂😆.
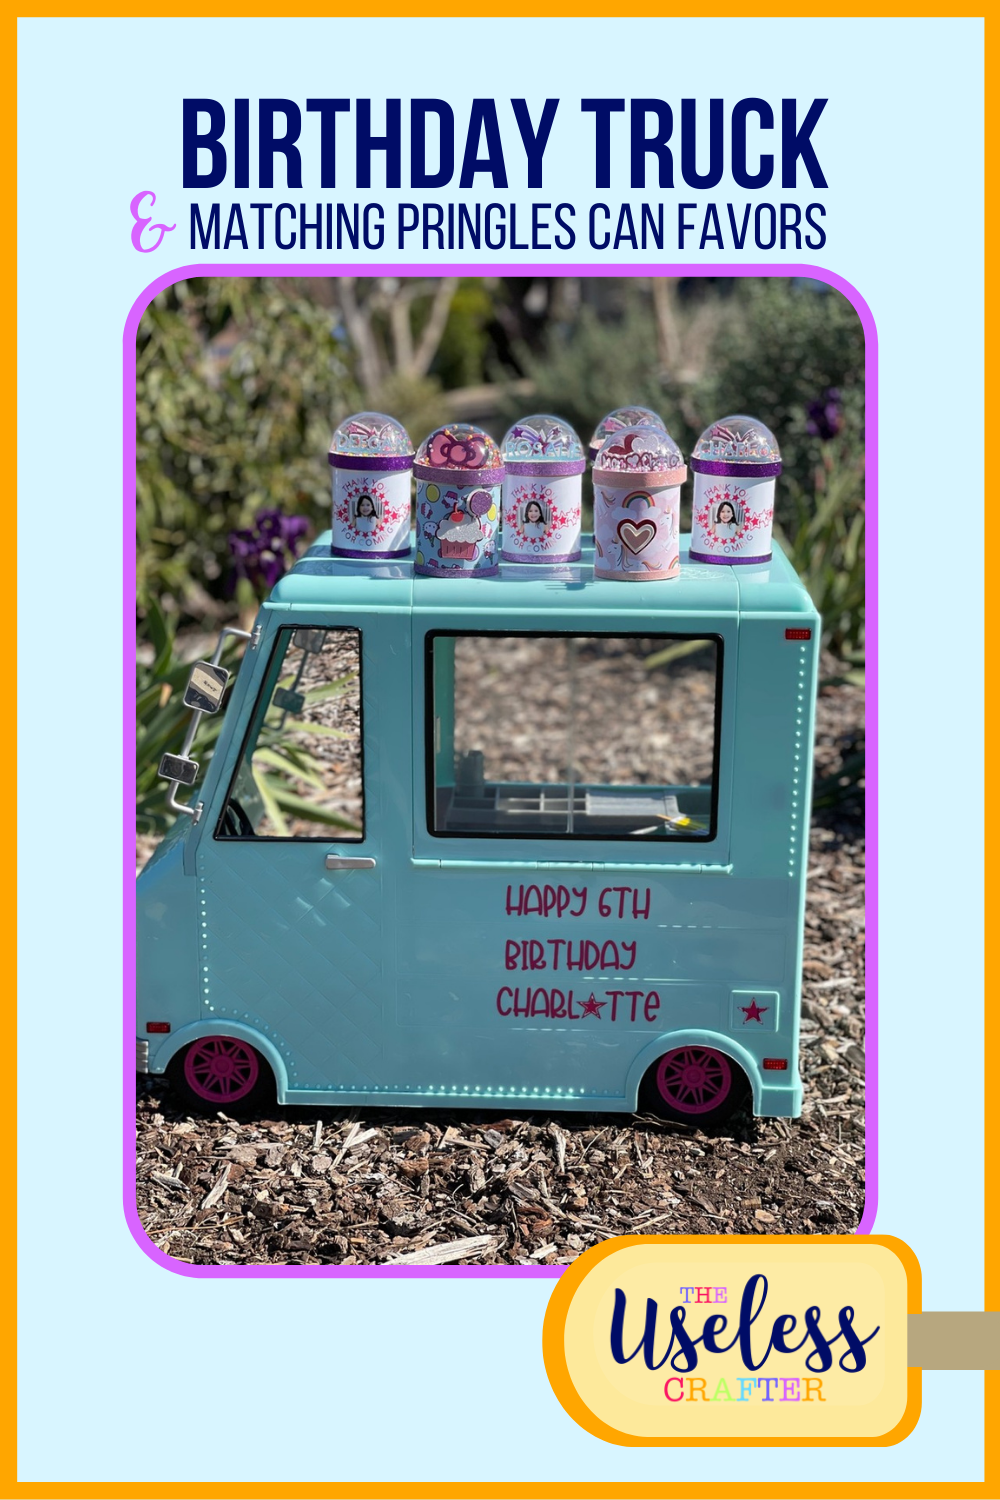
AMERICAN GIRL PARTY: CAKE TOPPER AND PRINGLES CAN PARTY FAVORS
In this tutorial I will show you how to make personalized party favors out of Pringle cans.
Just when I thought it was time to give away this ice cream truck and gain some space, I realized it’s a dream party prop 😍😁.

DIY 3D LETTERS: TIANA - PRINCESS AND THE FROG
3D letters for a Princess and The Frog Tiana themed party! This was a brand new area for me this year and I absolutely loved it. I’m still learning how to add to it cause surprisingly it’s different than layering a cake topper or banner. But this is definitely on my list for 2021 to get better at editing/adding/designing. 💚💚💚.
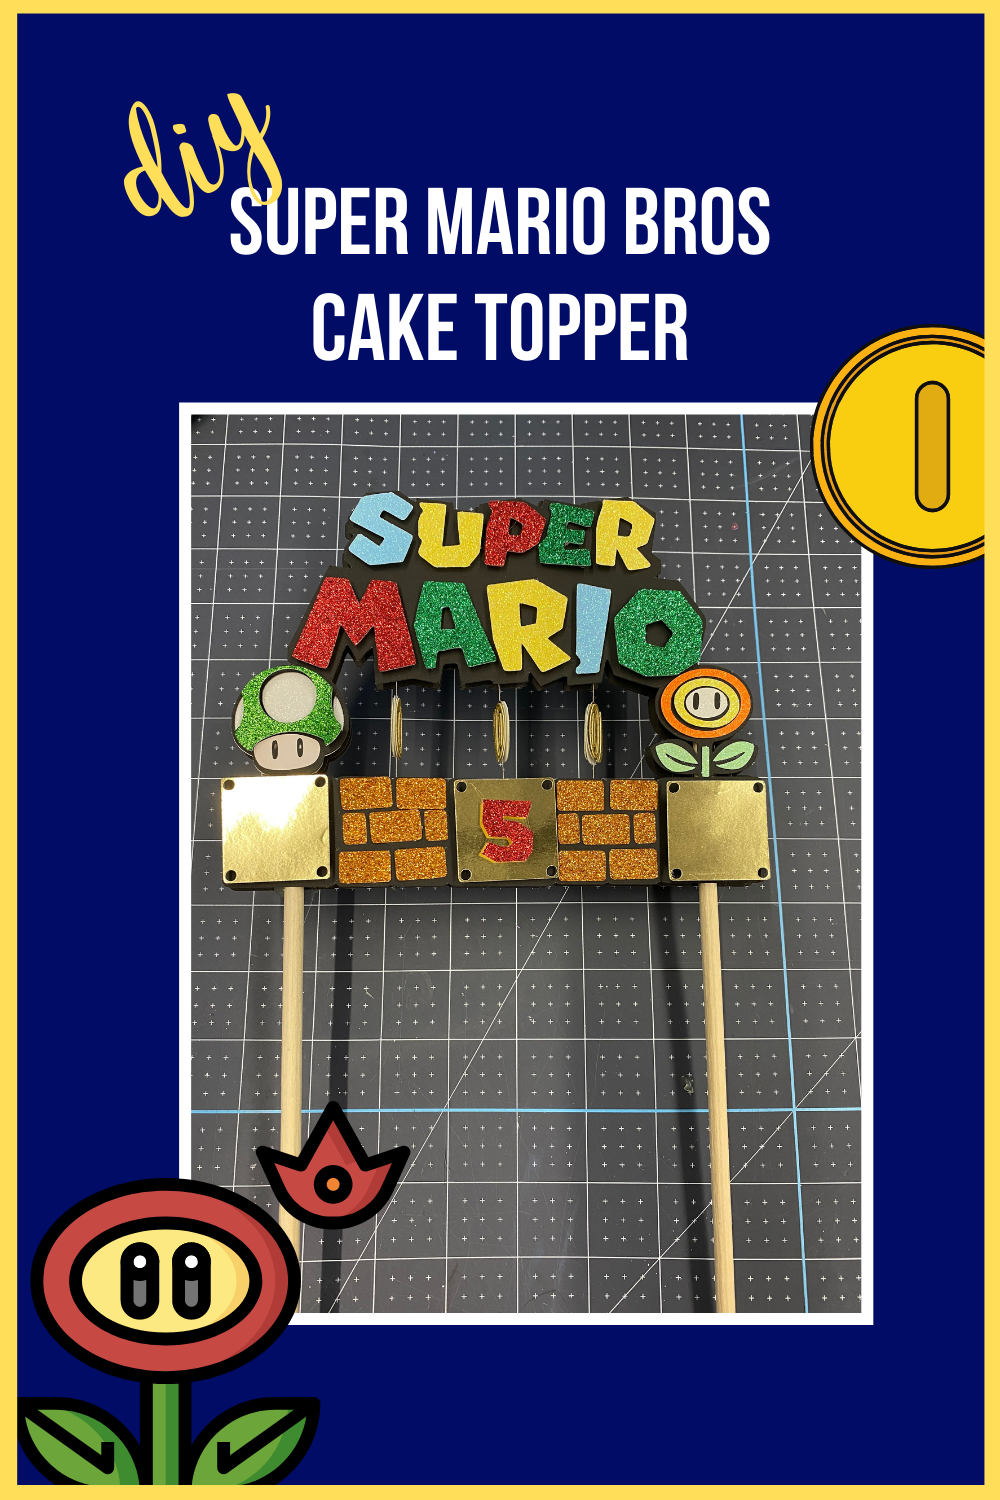
DIY MARIO BROS CAKE TOPPER
One of my favorite cake toppers ever!!! A close friend came up with ir and let me remake it.
The coins spin when you blow out the candles!!

MILESTONE SHAKER and slider: KINDERGARTEN / BACK TO SCHOOL
What is it? It’s another milestone shaker! This time for my daughter who is starting kindergarten. I’m missing a true mommy moment of documenting her first day of kindergarten. So of course what’s the next best thing? Making her home desk as EXTRA AF. One week left!!! Any suggestions? 😂🤣🥰.

MERMAID CAKE TOPPER
Another day, another cake topper shaker order. I love how all the colors shine and it’s just all so extra. 😂🥰🧜♀️ 🐳 💙💜💚.
Tips:
1. Foam sheet cuts on my Cricut Maker on flex foam setting using the rotary blade - cuts like 🧈.
2. For Print and Cut, I added white circles behind the purple beads so that it won’t try to cut around those tiny details. I try to avoid anything that will give me a headache. Lol. I’ve had plenty of times when the image is ruined cause it ripped during the last step.
3. Sequins is like ordering food - it’s better to have leftovers than to be left hungry. #moreisalwaysbetter 😂🤣.

MILESTONE SHAKER: FIRST TOOTH
I'm starting a new trend - milestone shakers! Ok, maybe everyone is already doing it and I'm totally late to the game. LOL. My 5 1/2 yr old went to the dentist last week and we were told there's movement! So sometime in the next 4-6 months, a tooth will be lost. She's my only one and I was feeling so emotional hearing the news. 😪😥. I knew I had to make something right away cause who knows what can happen during my quarantine fatigue.

LAWNMOWER CAKE TOPPER
This 5 yr old wanted this lawnmower. 😂🤣. Let me just say there was not a single lawnmower cake topper on Pinterest or Etsy to get ideas! It was a challenge for me to limit my glitter cardstock. 😂🤣. I hope he enjoys the John Deere mower and the hammers in the shaker. Lol.
Tip: for the slider, the Perler brand perler beads are great! Thanks to @thecraftyblock on IG for this awesome idea. ❤️💕💜.

DIY BUTTERFLY GRADUATION CAP
I am in love with how this turned out and hopefully one day my daughter will too! At least it’ll be fully documented how much work went into this. 😂🤣
Originally I thought about doing it straight onto the cap, but this cardstock layer might be a good option in case you want pics with and without OR the school doesn’t allow it for the official graduation. Add the tassel and I think the whole thing is very stable.

DIY PERSONALIZED WELCOME MAT USING FREEZER PAPER & THE CRICUT TUTORIAL - TAKE 2
I had to try this again ... And loved it! Special thanks to @karley.hall for the tip to use the squeeze bottles to put directly on the mat 👏🙌😍

DIY PERSONALIZED WELCOME MAT USING FREEZER PAPER & THE CRICUT TUTORIAL: 1st attempt
HOLY S H I T - this was tedious 🤯😆😂. I think my expectations weren't set properly so I'll make a second mat and will let you know how how I feel 😂😆
* Used freezer paper and transfer tape to get it on the mat
* Easy press to get it to stick
* acrylic paint
* Waiting to dry before sealing
* Touch-up paint after pulling off the freezer paper stencil
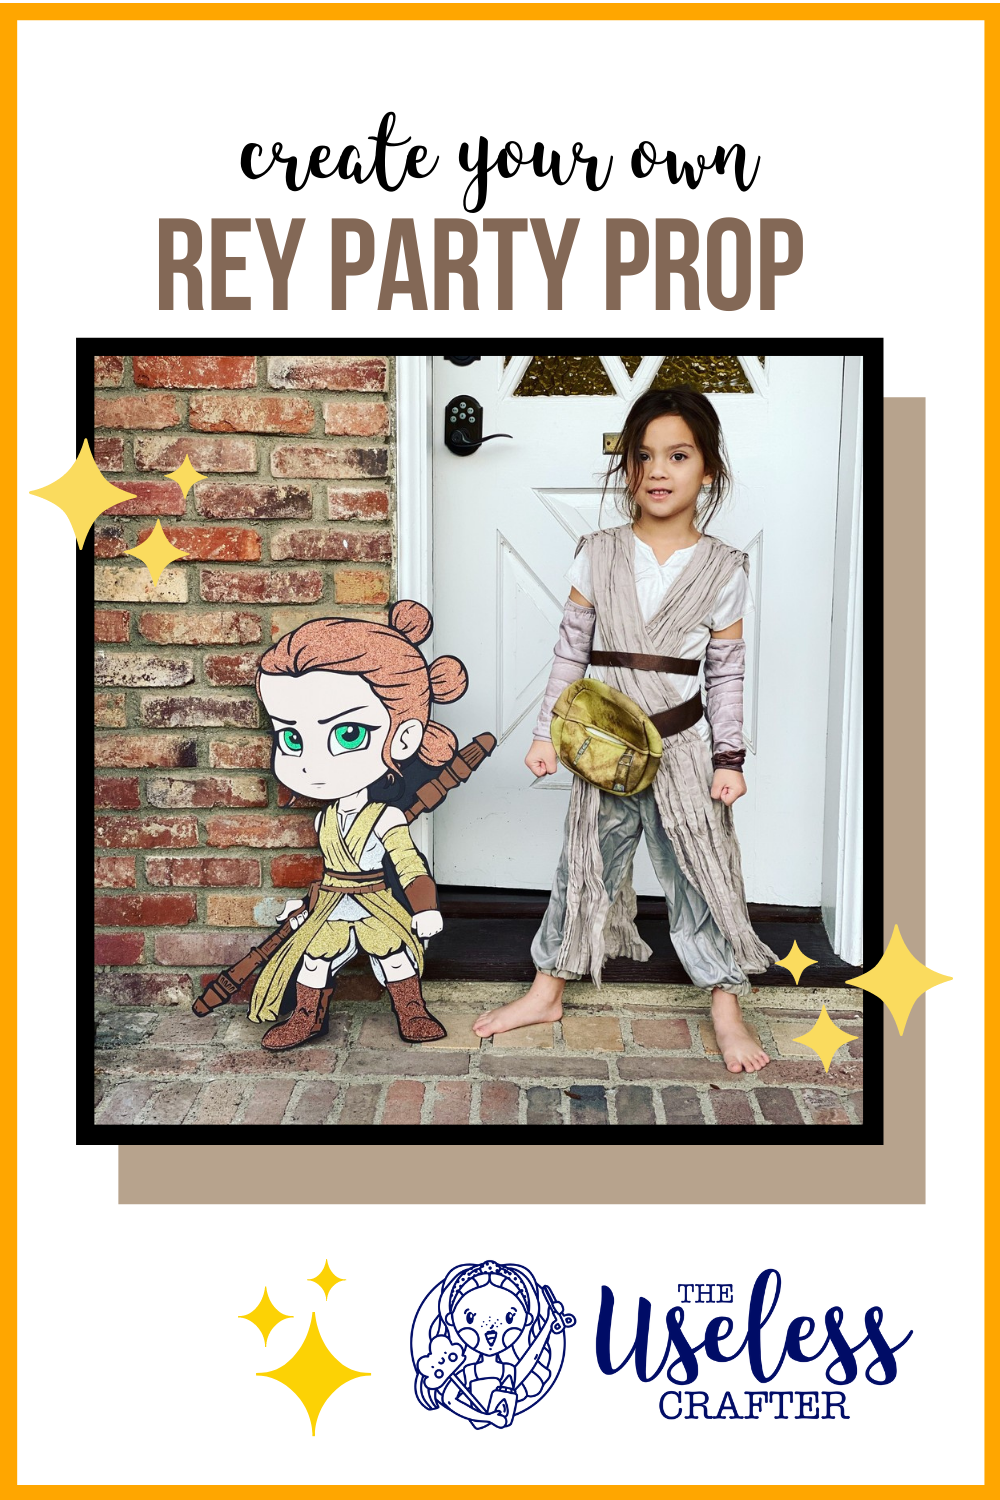
OFF THE MAT: REY - STAR WARS
Look at this little badass - Rey from Star Wars! She’s 30 inches of cardstock and stinking adorable ❤️💙💚💛💜🧡
Tips:
1. Do not attempt to do this any smaller than 30 inches. There are too many details (aka little pieces).
2. There are many pieces that need to be modified (unlock to make bigger) in order to weld with another piece. Otherwise you will have even more pieces than you will want to deal with. 😂🤯😬